| ProLinga Tutorial |
|---|
In the previous chapter we painted a data entry screen. We now have to put the functionality in place. First a bit of explanation how we can get data in to and out of the screen.
In ProLinga we created a table called "Device". For every table you create in ProLinga, there
will be a table buffer available. A table buffer can hold a value for every data dictionary of
every record of a table. An object, like this table buffer, is called a Data Reference
. Other examples of Data References are Variables and Constants for instance. Data
Reference can be referenced from ProLinga logic and screens with a prefix.
The prefix of a single
table buffer entry is F-, referring to a single Field of the table buffer. (It will be clear
later on why F is used and not T for instance). The syntax of a table buffer field reference
is: F-data_dictionary_name.table_name.record_name
So to reference the field deviceNumber in the table Device, we use the reference:
F-deviceNumber.Device.Device The last section, the record section, can be omitted and in that
case the default record of the table will be used. Since we only have one record called Device
which then automatically is our default record, we can shorten this to F-deviceNumber.Device
In ProLinga logic we can assign a value to or from the a table buffer entry using the logic command LET. So LET F-deviceNumber.Device = 123 as an 'assign to' example and LET V-deviceNumber = F-deviceNumber.Device as an 'assign from' example. See the reference manual for more details on this.
We can also link data references to screen fields. There are situations that you want to move data from the screen field to the data reference, from the data reference to the screen field or both. To cater for this we have to indicate which of the two data moves we want to do.
To further not confuse a data reference prefix with an action prefix, "D:" is appended in front. If we return to the example of F-deviceNumber.Device, the data reference calls are as follows:
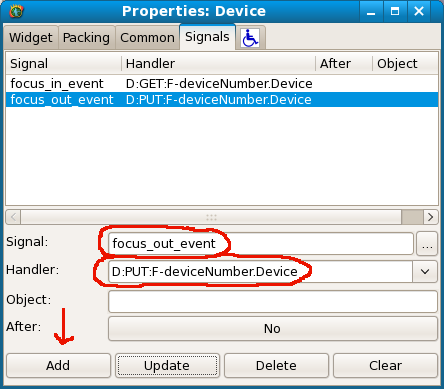
D:GET:F-deviceNumber.Device
D:PUT:F-deviceNumber.Device
Like any action handler, we have to link a signal to a data reference call, so the system
knows when to make the data move. In our situation
we want data to move FROM the data reference to the field, when the focus enters a field and we
want to move data (that we just typed for instance) TO the data reference when the focus leaves
the field. There are many signals available in GTK+, but most of the time the signals
focus_in_event and focus_out_event does the job.
Knowing this, we can now return to our application. Open it in the ProLinga developer and bring up the screen "Device" in the painter. Click on the entry field (spin button) for deviceNumber and go to the properties screen. Under the tab "Signals" add the signals "focus_in_event" and "focus_out_event" for the GET and PUT of F-deviceNumber.Device.
The same way set the following data references as well:
F-description.Device
F-dateInstall.Device
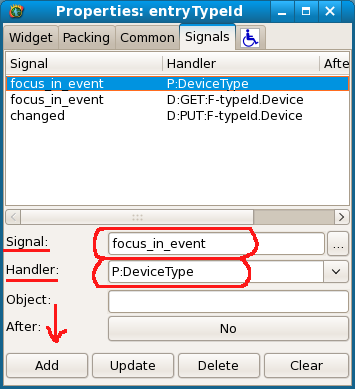
The field "Type Id" needs some further explanation being a "ComboBox". As soon as this object is created we want the values of the Pick List "DeviceType" that we made earlier to be available in this object. For "ComboBox" and "ComboBoxEntry" objects, we have the Data Reference prefix P: available. So link P:DeviceType to signal "focus_in_event" which is emitted at screen creation time. The Data Reference GET is the same as other fields and the Data Reference PUT is not linked to the focus_out_event, but to the "changed" signal, so every time a user selects a value, the underlying data reference is updated.
As a general rule, do not forget to save your screen in between making major changes, to prevent having it to do all over again, in case of any type of user/system error.
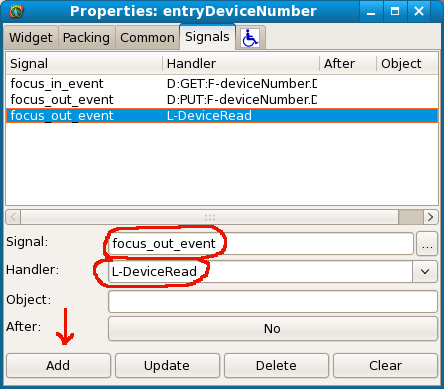
Now that we have the actual fields in place, we can finish the remainder of the action handlers. As soon as the user enters a device number and the focus leaves that field, we want to see all the details of that device number if it exists, or a message that a new device number can be added if the number does not exist. This means we have to link a logic to a signal from the deviceNumber field. The signal is again "focus_event_after" and the logic we want to call (and which we will create later) is "L-DeviceRead".
As you can see we can use the same signal multiple times and mix it with the use of actions and data references.
Now we link actions to the remaining objects on the screen:
Table 5. Action Handlers Remaining Screen Objects
| Object | Signal | Action Handler |
|---|---|---|
| Find button. | clicked | L-SearchDeviceNumber |
| Delete button (left below). | clicked | L-DeviceDelete |
| Cancel button. | clicked | L-Home |
| Apply button. | clicked | L-DeviceApply |
| OK button. | clicked | L-DeviceOK |
As you maybe noticed, we want to call logic L-Home rather than the expected L-Cancel for the Cancel button. Remember that the Device screen is now integrated into the main screen. When cancelling the screen we really want to just clear the frame/container that holds the Device (sub) screen. To avoid confusion, we call this "Home".
Now save the screen and run your application. Make sure all buttons on the Device screen now generate
an error like "Logic [xyz] does not exist" when you press them.
Notice also that this error is triggered when
you place the cursor on the Device Number field and then leaving it by placing it somewhere else.
We are now finished painting the Device screen and now we have to go into ProLinga logic to get it all to work.
| << Create Picklist | Write Logic Data Screen >> |